Good Shabbos, Shabbat shalom! There’s a minhag – a custom – to bake shlissel challah the first Shabbat after Passover as a segula (ritual or good omen) for your parnassah, your livelihood. Some people shape their challah dough into the shape of a key, while others prefer to place a foil-wrapped key into their challah dough before baking it. (If that’s your preferred method, don’t forget to remove the key before biting into it!)
Sarah Bokchin of Borough Park, New York, loves to cook, bake and posts beautiful photos of her culinary creations. She makes a gorgeous garlic-stuffed shlissel challah and shared detailed how-to photos to my Facebook group, Norene’s Kitchen. Intrigued, I asked if she would also share them with my CJN readers.
READ: THE KEY TO A GREAT SHLISSEL CHALLAH
Bokchin told me she has several delicious challah recipes in her repertoire, including a healthy whole-wheat loaf as well as her grandmother’s light and fluffy recipe. For her shlissel challah, Bokchin modified Susie Fishbein’s recipe from Kosher by Design.
“Not only is Susie’s recipe delicious, it also holds its shape well, making it an excellent choice to make shlissel challah,” Bokchin told me. “This makes a very big recipe, so I make one shlissel challah from the dough and fill it with a marvelous minced garlic/olive oil mixture. I use the remaining dough to make several regular challahs. Enjoy!”
Note: Norene’s prize-winning challah, updated, is perfect if you want to make a smaller recipe.
SARAH BOKCHIN’S GARLIC-STUFFED SHLISSEL CHALLAH
Susie Fishbein’s Challah (bottom recipe)
2 heads garlic (24-30 peeled garlic cloves)
6 to 8 tbsp olive oil
- Prepare challah as directed below, following steps 1-7.
- In a food processor fitted with the steel blade (S-blade), process garlic until minced, using on/off pulses. Add oil and process just until combined. Don’t puree it!
- Prepare baking pans, forming a key shape.
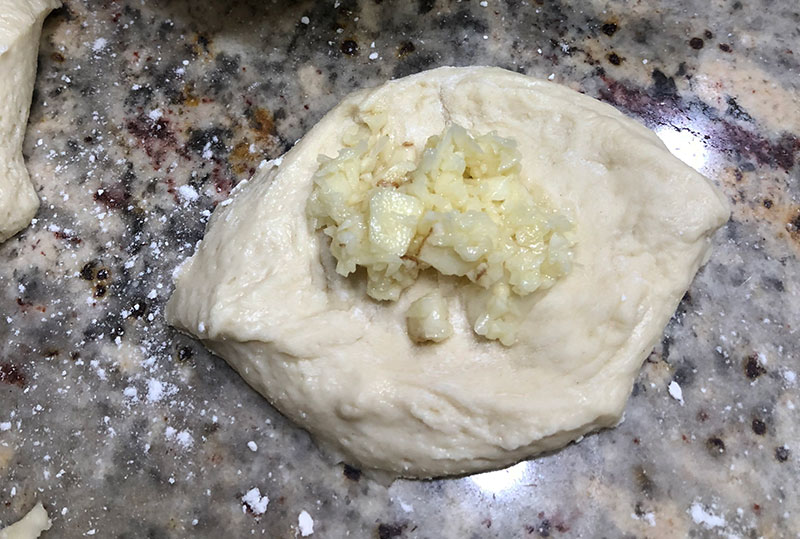
- Take about 1/6th of the dough and divide it into equal-sized balls. Flatten each ball into a disk. Place a spoonful of garlic/oil mixture into the centre of each disk. Bring the sides of dough up to form a ball, enclosing the garlic mixture completely.
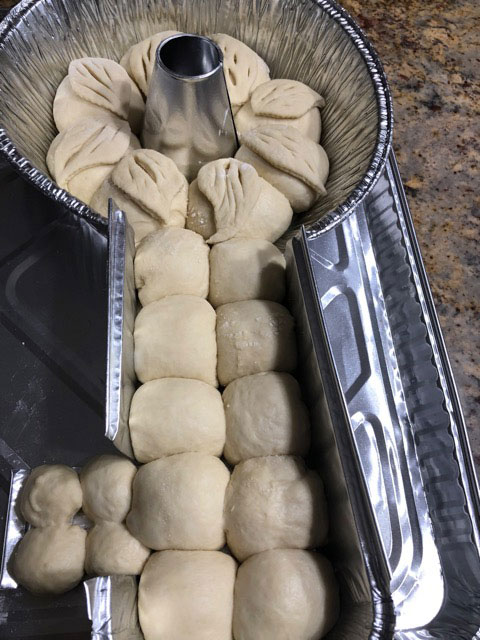
- Arrange eight of the balls to form a ring in the greased foil tube pan. (If you don’t have a foil tube pan, arrange the balls so they form a ring; place on a cookie sheet lined with foil that has been sprayed. Place a parchment-wrapped custard cup in the centre of the ring to help keep its shape.)
- Form additional balls and fill each one with garlic mixture. Seal well. Arrange remaining balls to form a key-shape loaf, forming a shlissel Decorate with “leaves” made from thinly rolled-out challah dough.
- Regular challahs: Form remaining dough into braided challah loaves as directed in Step 8 of Susie Fishbein’s recipe. Let challahs rise, covered, for 30 minutes.
- Brush with egg glaze and sprinkle with sesame seeds. Bake in a preheated 350 oven for 30 minutes, until golden brown.

SUSIE FISHBEIN’S CHALLAH
Adapted from Kosher by Design by Susie Fishbein
Yield: 6-7 challahs
Fishbein shares: “I love the ease of making challah in my bread machine. However, there are times that I love the experience of spending a Thursday night in the kitchen with my three daughters baking challah the old-fashioned way it’s been done by mothers and daughters for generations. The mixing and kneading become a group effort with lots of giggling to go around. The anticipation of Shabbat fills the air. This is my family’s favourite recipe. It produces light and chewy challot and the aroma makes our house smell great for days.”
- ½ cup warm water
- 4 (¼-ounce) packages dry yeast
- 1 tbsp sugar
- 7 large eggs
- 2 cups sugar
- 1 ½ cups vegetable oil
- 7 tsp salt
- 4 cups boiling water
- 1 (5-pound) bag unbleached all-purpose flour or high gluten bread flour, plus extra for kneading
- 1 large egg, lightly beaten
- Sesame seeds
- Poppy seeds

- Place the warm water, yeast and 1 tbsp sugar into a large glass measuring cup or bowl. Set aside in a warm place. (If your kitchen is cold, put it on your opened oven door with the oven temperature set at 300 degrees.)
- Crack 7 large eggs into an 8-quart pot and mix. In a separate large bowl, combine the 2 cups sugar, oil, salt and boiling water. Mix with a wooden spoon.
- When yeast is bubbly (proofed) add the yeast mixture into the egg mixture. (If the yeast does not get bubbly, then it is dead and you must discard it and make the yeast mixture again with new yeast.)
- Add the sugar/oil mixture into the pot. Stir. Add the flour into the pot in 3 additions, mixing well with wooden spoon between additions.
- Sprinkle ½ cup flour on your kneading surface. Knead the dough for 10-15 minutes, adding flour to the surface as needed. Try not to add too much. It is easier to add more to a sticky dough than to restore a dough once too much flour has been added.
- Put the dough back into the original 8-quart pot. Wet a kitchen dishtowel, wring it out well, and use it to cover the top of the pot. Try not to lift the towel, as air will dry out the dough.
- Let the dough rise for 2-3 hours. Turn the dough out onto a floured surface. This is the point where you separate challah for the mitzvah. Make the blessing, then take off a piece of dough. Preheat oven to 350 degrees.
- Using a dough cutter or sharp knife, divide the dough into 6-7 equal sized pieces. Divide each piece into 3 sections. Roll each section into a long strand. Lay the three strands in front of you. Pinch the top ends together. Braid the dough and pinch the bottom ends together. Place on parchment-lined or lightly greased baking sheets. Repeat with remaining dough. At this point you may freeze some of the challot. I place them on the baking sheet in the freezer to ensure that they freeze flat. When dough is frozen, remove and wrap each challah in a heavy-duty zip-lock bag. When ready to use, remove from freezer, place on baking sheet, and leave out to thaw completely. Proceed with recipe.
- Let rise covered, for 30 minutes.
- Brush challot with 1 beaten egg. Sprinkle with sesame or poppy seeds. Bake for 30 minutes or until golden brown and challah sounds hollow when tapped on bottom.


